
Build · 22 min read
Rainwater Harvesting for Garden and Shop
Screen the gutters, divert the dirty first flush, elevate a sealed barrel, and overflow away from the foundation—then use the water on plants, not in a glass.
A rain barrel is a short plumbing project, not a tank you hope is magic. You are catching roof water for gardens, shop mop buckets, and washing tools. Unless you add filtration and disinfection designed for drinking water—and follow your health department—this water is not potable. Label the spigot. CDC’s overview is blunt and useful: Collecting rainwater and your health.
Some states and towns restrict collection. Check before you plumb a downspout. Then build a system that will not breed mosquitoes or dump overflow against the basement wall.
What you are assembling
- Clean-ish roof and gutters
- A leaf screen and, ideally, a first-flush diverter
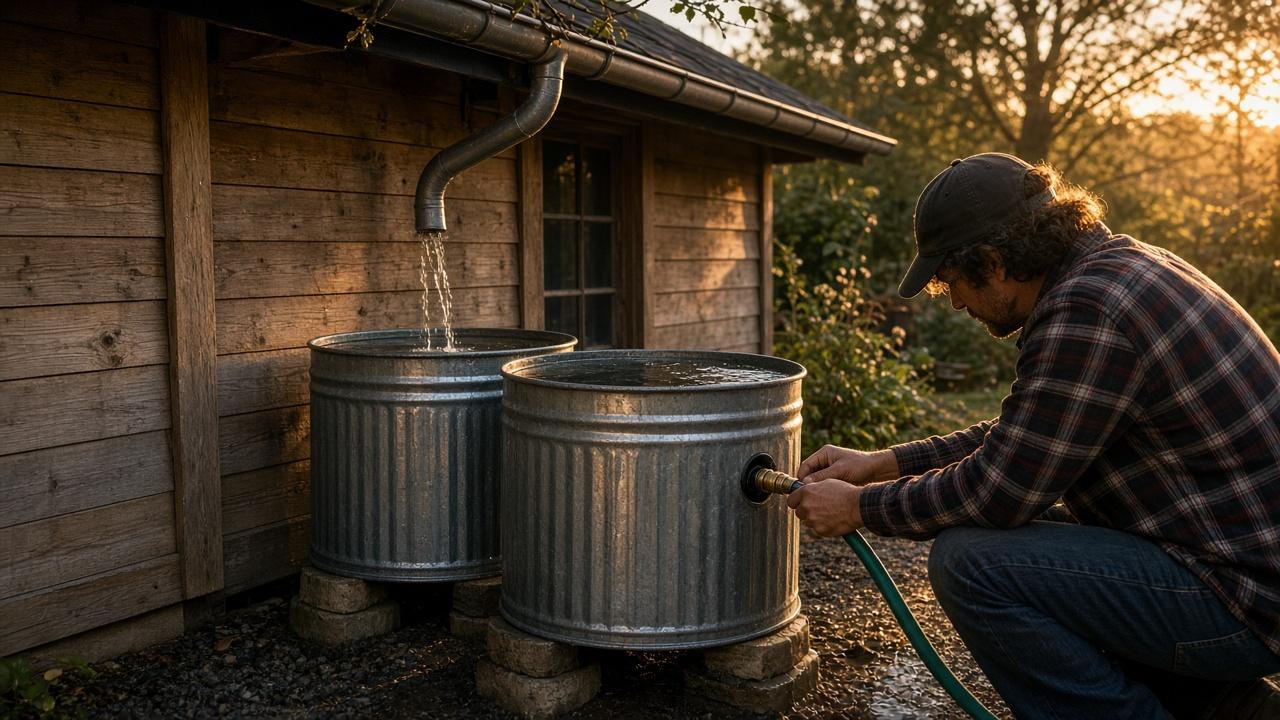
- An opaque barrel with a sealed lid
- A screened inlet and a screened overflow
- A spigot high enough that a watering can fits, on a stand that cannot tip
- Overflow piped to a rain garden, gravel, or a downslope—not to the foundation
A 55-gallon barrel is the right first size. Two barrels in series are better than one giant cistern you cannot move.
Tools and materials
- Food-grade or dedicated rain barrel (opaque plastic). Clear barrels grow algae.
- Bulkhead fitting and a hose-thread spigot, or a kit
- Overflow fitting and a length of 1.5-inch hose
- Window-screen-or-finer mesh: NC State wants overflow mesh finer than 1/16 inch so mosquitoes cannot pass. See Mosquito control for rainwater harvesting systems.
- Cinder-block or timber stand on packed gravel, level
- Downspout diverter or a cut-in elbow
- First-flush kit or a 3-inch PVC standpipe with a slow-drain hole and a cleanout cap
- PTFE tape, exterior silicone, stainless screws
- “Non-potable / do not drink” labels
Step 1 — Do the gallon math so you are not shocked
A rough U.S. rule: 1 inch of rain on 1,000 sq ft of roof ≈ 600 gallons. You will not catch all of it. A 55-gallon barrel fills in a modest storm off a small garage roof. That is fine. The barrel’s job is to shave the first hours of watering, not to replace the municipal tap in July.
Pick the downspout that already dumps near the garden.
Step 2 — Clean the collection path
- Gloves on. Gutters full of composting leaves make barrel tea.
- Install a gutter guard or a downspout leaf separator. The less organic sludge in the barrel, the less it stinks.
- Look at roofing material. Very old bitumen, flaking paint, or a green copper roof is a reason to keep this water on ornamentals only—or skip that roof.
Step 3 — First flush
The first minutes of rain wash bird droppings, dust, and dissolved gunk off the roof. A first-flush diverter is a vertical pipe that fills first, then lets cleaner water continue to the barrel. CDC recommends considering one.
A simple version:
- Tee the downspout into a 4–6 foot vertical 3-inch PVC pipe with a cap at the bottom.
- Drill a 1/8-inch weep hole in the cap so the pipe slowly empties between storms (or unscrew and dump it).
- When that pipe is full, water flows onward to the barrel.
You will still get dirty water in a monsoon. The diverter just takes the worst off the top.
Step 4 — Stand, barrel, and fittings
- Build a level, stout stand. Water weighs 8.3 lb per gallon. A full 55-gallon barrel is about 460 lb. Blocks on gravel beat a wobbly pallet.
- Strap the barrel to the wall or a post if kids or wind could tip it.
- Install the bulkhead a few inches up from the floor so sludge stays behind, plus a drain cap at the true bottom for yearly cleaning if you can.
- Fit the overflow near the top, piped away from the foundation to a mulched basin or an existing drain. Unscreened overflow is how mosquitoes commute. Screen it.
- Seal the lid. Inlet through a screened drop, not an open trash-can mouth.
Tip: Elevate the barrel at least 12–16 inches if you want gravity to push a hose to a nearby bed. Gravity will not climb a hill. For uphill beds you need a small pump later—not on day one.
Step 5 — Tie in the downspout
- Cut the downspout and add a diverter so you can send water back to the original splash block in winter or during overflow disasters.
- In freeze climates, disconnect and drain before hard frost. Ice will split fittings and sometimes the barrel.
- Reconnect in spring. Put it on the calendar.
Step 6 — Use it, label it, don’t sip it
- Garden and compost: yes
- Rinsing tools, mixing concrete, mopping the shop: yes
- Pets’ drinking water, kids’ splash table, pressure-canner water: no
- Drip irrigation: add a filter; barrel grit clogs emitters
Empty standing water if you cannot keep screens perfect. CDC’s other mosquito note: empty at least every 10 days if the barrel is not well sealed.
Monthly glance
- Gutters after big leaf drop
- Screens intact
- Overflow still pointing downhill
- No algae greenhouse effect (if you see green, the barrel is getting light—paint it or wrap it)
- Stand still level
EPA’s municipal handbook on harvesting is dry and thorough if you ever grow past barrels: Harvesting municipal handbook (PDF).
What usually goes wrong
- Overflow against the house “just for now”
- Open lid, mosquito ranch
- Barrel on four bricks in mud, then a slow lean and a flood
- Using the water in the coffee maker because it looks clear
Further reading
- CDC: collecting rainwater and your health
- NC State Extension: mosquito control for rainwater systems
- EPA rainwater harvesting literature review (PDF)
- Local health department or building page for rain-barrel rules
When the overflow is screened, the stand is ugly-strong, and the spigot says do not drink, you have a real system.
Want more like this? Browse the full Build collection.
Keep building

Home Defense: Building Secure Perimeters
Walk your lot, map the real approach paths, then layer lighting, gravel, gates, and sightlines so the place is easier to live in—and harder to wander into unnoticed.
Read more
How to Design and Build a Root Cellar
Borrow the ground’s coolth the right way: drain the site, vent it on purpose, and store each crop in the temperature and humidity it actually wants.
Read more
Off-Grid Solar Basics for a Small Cabin or Shop
List every watt-hour you actually use, size batteries and panels from the worst month, then match a charge controller and inverter—without skipping disconnects, fusing, or a licensed electrician when the service gear gets real.
Read more